Creating a work order in the mobile app
You can easily create work orders in the field using the Asset Essentials mobile app.
Watch the video tutorial:

- Tap the plus button (
 ) at the bottom of the screen.
 - Tap + Work Order.
Creating a work order
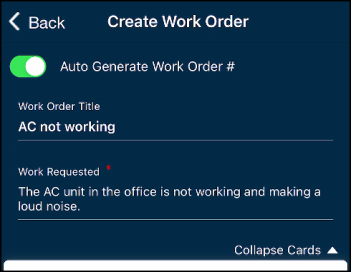
- Leave the Auto Generate Work Order # option enabled if you would like the system to generate a Work Order # for your work order once you have submitted it. If not, tap the slider to the off position so you can enter your own Work Order #.
- Enter the Work Order Title.
- Enter a description of the issue in the Work Requested field.
The remainder of the work order form is broken up into cards that can be expanded or collapsed by tapping on the title of the card. Be sure to go through the form and fill out any required fields as noted by the red asterisk ( ) symbol. *Note: Depending on your account's configuration, some cards may not be visible, and some fields may already be pre-populated with information.
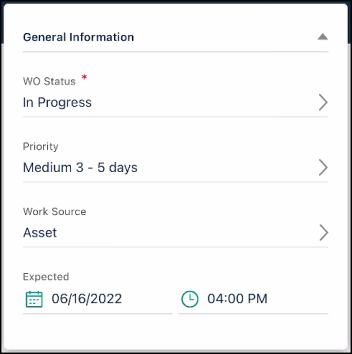
General Information
- Select the WO Status from the menu if necessary. Depending on your account's configuration, a WO Status may be pre-selected.
- Choose the Priority.
- Select the Source Type. The source type determines what the work order is associated with. The next work order card you will fill out after the General card will change to match your selection in this field. *Note: The Source Type can be changed after the work order is created if necessary.
- Select the date and time the work order is Expected to be completed.
- Once the work order is saved, the Days Aged will display in this card.
Source type
This section title will vary depending on what was selected as the Source Type in the General card of the work order. If Unknown was selected as the Source Type, this card will not be visible.
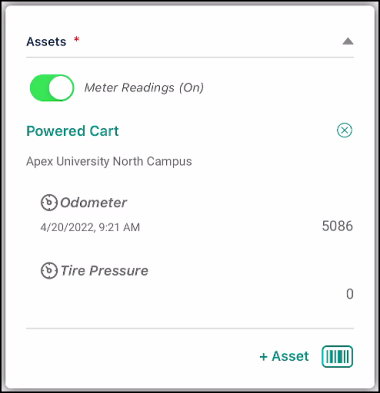
Assets
- Tap + Asset to search and select one or more Assets from a list or tap the scanner icon (
 ) to scan a QR code or barcode of the Asset.
 - Tap OK to associate the selected Asset(s) to your request.
- If you need to remove the asset from the request, tap the remove icon (
 ) next to it.
- If you need to remove the asset from the request, tap the remove icon (
- Tap the Meter Readings toggle to reveal the meter titles associated with this asset.
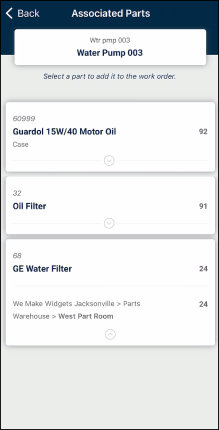
- To see any associated parts, tap the Asset name.
- Tap Associated Parts.
- Tap the down arrow to expand an associated part and view all the locations where it is stored.
- Tap on a part to add it to the work order. *Note: You can add associated parts to a work order once the work order has been saved.
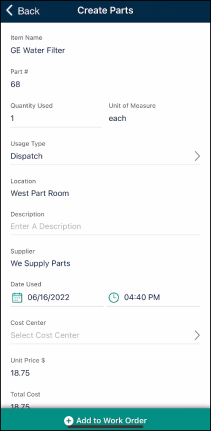
- The form will default to the first part location in the list. You can change the location by tapping into the Location field and selecting a new one.
- Update the Quantity Used and other necessary fields on the form.
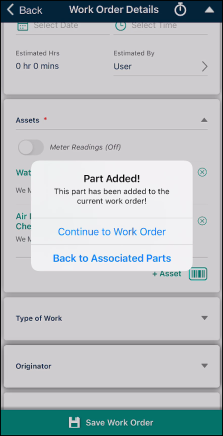
- Tap Add to Work Order.
- In the confirmation window, tap Continue to Work Order to navigate back to the work order or Back to Associated Parts to add more parts to the work order.
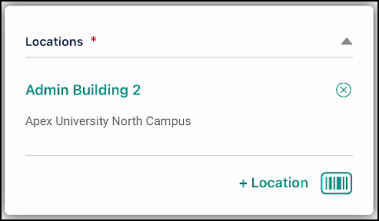
Locations
- Tap + Location to search or filter for one or more Locations from a list, or tap the scanner icon () to scan a QR code or barcode of the Location.
- Tap OK to associate the selected Location(s) to your request.
- Tap the remove icon () to remove the Location from the request.
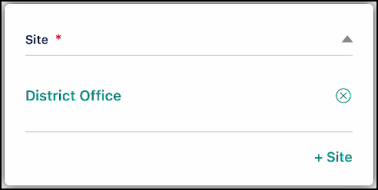
Site
- Tap + Site to search and select a Site from a list. *Note: You may or may not be able to select multiple Sites depending on the account's configuration.
- Tap OK to associate the selected Site to your request.
- Tap the remove icon () to remove the Site from the request.
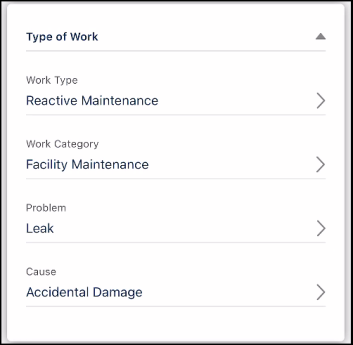
Type of Work
- Select the Work Type.
- Select the Work Category.
- Select the Problem.
- Select the Cause of the issue if known.
Task
-
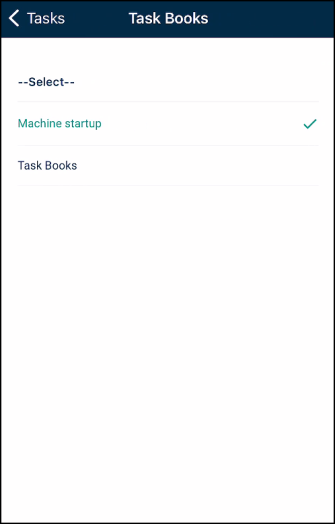
Tap +Task Books to view a list of available task books that can be added to the work order.
-
Search for the appropriate task book in the list.
-
If the task book you need does not appear in the list, go to the Settings page and tap Refresh Account Settings. This will re-download all data from the web account and bring in any new task books that have been created. *Note: This refresh happens automatically every 24 hours.
-
-
Tap on a task book to select it. All tasks within the selected task book are now copied to the task card on the work order.
-
If you need to add tasks from another task book to the work order, tap the arrow icon to go back to the Work Order Details screen and tap Save Work Order. Then repeat the steps above to select the next task book. The new tasks will follow the tasks from the first task book and will be automatically renumbered based on existing tasks on the work order.
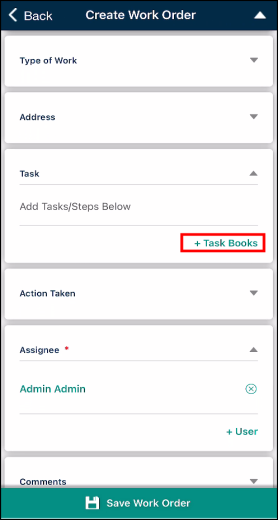
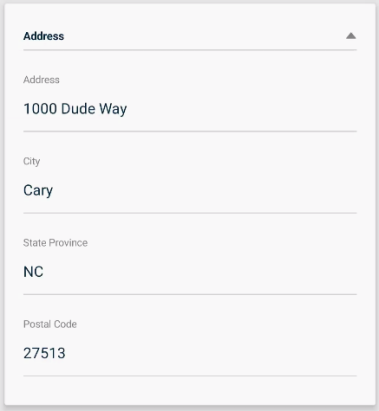
Address
Depending on your account's configuration, you may need to enter an Address for where the work is being requested from or needs to take place.
- Enter the Address, City, State Province, and Postal Code.
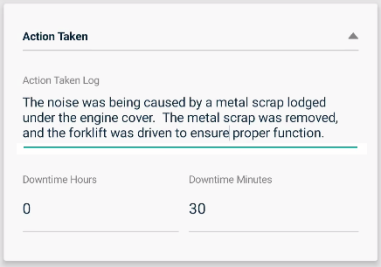
Action Taken
- If the work order has already been completed or is in the process of being worked on, you can enter what was done to address the work requested in the Action Taken Log field. We recommend providing as much detail as possible.
- If the work caused the related Asset, Location, or Site to be unavailable for a period of time, enter the Downtime Hours and Downtime Minutes.
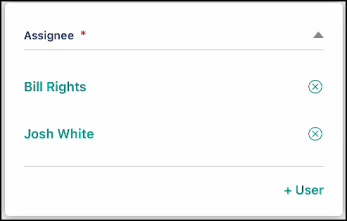
Assigned to
- Tap + User.
- Select whether to assign yourself the work order by tapping the Add Me option, or tap the Add Other Users option to assign to other users at your organization. *Note: If you are already assigned the work order, you will immediately be taken to the user list to choose another user to assign to the work order.
- Tap OK to assign the selected User(s) to your request.
- Tap the remove icon () to unassign the User from the request.
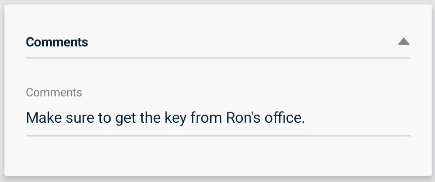
Comments
- Enter any additional Comments here.
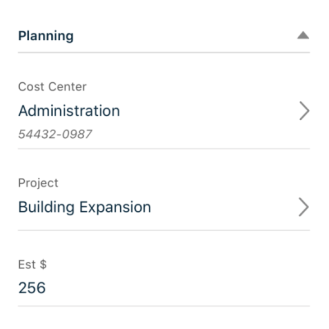
Planning
- The Cost Center field will be automatically populated or left blank depending on the following guidelines:
- If the source tied to the work order has a cost center assigned, then the cost center field will be automatically populated with that cost center.
- If there are multiple sources assigned to the work order that have multiple cost centers assigned, then the cost center field will be blank.
- If the source does not have a cost center assigned, then the cost center field will be automatically populated with the work order template's associated cost center.
- Select a new or different Cost Center, if applicable.
- Select a Project if the work order is associated with a specific project being tracked by your organization.
- Enter the Estimated Cost of completing the work.
Attachments
Taking a photo
- Tap the Take Photo icon to launch your device's camera. *Note: Depending on the type of device you are using, you may be asked to allow Asset Essentials permission to access your camera. This permission is necessary for Asset Essentials to attach photos taken with your device to the work order. Tap Allow if you are prompted for this permission.
- Use your device's camera to take the photo.
- Once finished, you can tap the Editbutton to annotate your photo if needed.
- If you are annotating a photo, use your finger or a stylus to draw on the photo.
- Tap the Save button to add any mark-ups drawn on the photo.
- Tap Done.
- Enter a Name for the photo if necessary.
- Tap Save to attach the photo to the work order.
Adding a photo
- Tap the Add Photo icon to launch your device's photo gallery. *Note: Depending on the type of device you are using, you may be asked to allow Asset Essentials permission to access your photo gallery. This permission is necessary for Asset Essentials to attach an already taken photo to the work order. Tap Allow if you are prompted for this permission.
- Select the photo on your device.
- Once finished, you can tap the Editbutton to annotate your photo if needed.
- If you are annotating a photo, use your finger or a stylus to draw on the photo.
- Tap the Save button to add any mark-ups drawn on the photo.
- Tap Done.
- Enter a Name for the photo if necessary.
- Tap Save to attach the photo to the work order.

- Tap the Save Work Order button at the bottom of the screen.
